Iron Condor Explained: The Complete Beginner’s Guide


📚 Beginner’s Guide to Options — Part 34 of 51
- Part 1: What Is an Option? The Absolute Basics Explained
- Part 2: Calls vs. Puts: The Two Types of Options You Need to Know
- Part 3: Strike Price Explained: What It Actually Means for Your Trade
- Part 4: Expiration Date Explained: Why It Changes Everything
- Part 5: Premium Explained: What You’re Really Paying For
- Part 6: In the Money vs. Out of the Money: A Beginner’s Breakdown
- Part 7: Intrinsic Value vs. Extrinsic Value: What Makes Up an Option’s Price
- Part 8: How Buying a Call Option Works, Step by Step
- Part 9: How Buying a Put Option Works, Step by Step
- Part 10: What Happens When an Option Expires? Every Outcome Explained
- Part 11: Options Contracts 101: What One Contract Actually Represents
- Part 12: How to Read an Options Chain Without Getting Overwhelmed
- Part 13: Bid, Ask, and Spread: What They Mean When You’re Trading Options
- Part 14: What Is Implied Volatility? A Beginner’s Plain-English Guide
- Part 15: Why Options Lose Value Over Time: Theta Explained Simply
- Part 16: Delta Explained: What It Really Tells You About Your Option
- Part 17: Gamma Explained: Why Delta Doesn’t Stay the Same
- Part 18: Vega Explained: How Volatility Changes Your Option’s Price
- Part 19: The Greeks Cheat Sheet: Delta, Gamma, Theta, Vega in Plain English
- Part 20: What Is Assignment? What Happens If Your Option Gets Exercised
- Part 21: American vs. European Options: What’s the Difference?
- Part 22: How Much Money Do You Need to Start Trading Options?
- Part 23: Paper Trading Options: How to Practice Before Risking Real Money
- Part 24: The Biggest Mistake Beginners Make Buying Options
- Part 25: Why Most Beginners Lose Money Buying Options (and How to Avoid It)
- Part 26: Covered Calls Explained: The First Options Strategy Every Trader Should Learn
- Part 27: Cash-Secured Puts Explained: A Beginner-Friendly Way to Get Paid to Wait
- Part 28: Vertical Spreads Explained: Reducing Risk on Your First Options Trade
- Part 29: Credit Spreads vs. Debit Spreads: What’s the Real Difference?
- Part 30: The Protective Put Explained: Insurance for Your Stock Position
- Part 31: The Collar Strategy Explained: Protecting Gains Without Selling
- Part 32: Straddles Explained: Betting on a Big Move (In Either Direction)
- Part 33: Strangles Explained: A Cheaper Way to Bet on a Big Move
- Part 34: The Iron Condor Explained for Complete Beginners (you are here)
⚡ Key Takeaways
- An iron condor is a neutral options strategy that makes money when a stock stays inside a specific price range until expiration.
- The strategy combines a bear call spread and a bull put spread to collect upfront cash while strictly capping your maximum risk on both sides.
- You do not need to pick winning stocks to profit with iron condors; you just need to identify stocks that will avoid massive price swings.
— Ben, Find Better Trades
Most beginners think making money in the markets requires predicting whether a stock is going up or down. When I first started trading, nobody told me that you could get paid simply because a stock decided to do nothing at all.
Welcome to Part 34 of our beginner options series. Today, we are breaking down the iron condor—one of the most popular and versatile income strategies in options trading.
What Is an Iron Condor? (The Bird With Four Wings)
An iron condor is a defined-risk options trade designed to profit when an underlying stock trades sideways. You set up a price boundary above and below the current stock price, and if the stock stays between those boundaries, you keep the money you collected upfront.
Think of it like setting up two goalposts on a football field. As long as the stock price kicks the ball right down the middle and stays between the posts, you win the trade.
Earlier in this series, we covered vertical credit spreads, where you collect cash by selling one option and buying another for protection. An iron condor is simply two credit spreads opened at the exact same time on the same stock with the same expiration date.
You sell an out-of-the-money call spread above the stock price, and you sell an out-of-the-money put spread below the stock price. This creates a four-legged trade that surrounds the stock from both directions.
Because you are collecting premium on both sides of the trade, you take in a net credit into your account the moment you open the position. Your goal is to let time decay do the heavy lifting while the stock wanders quietly inside your chosen profit zone.
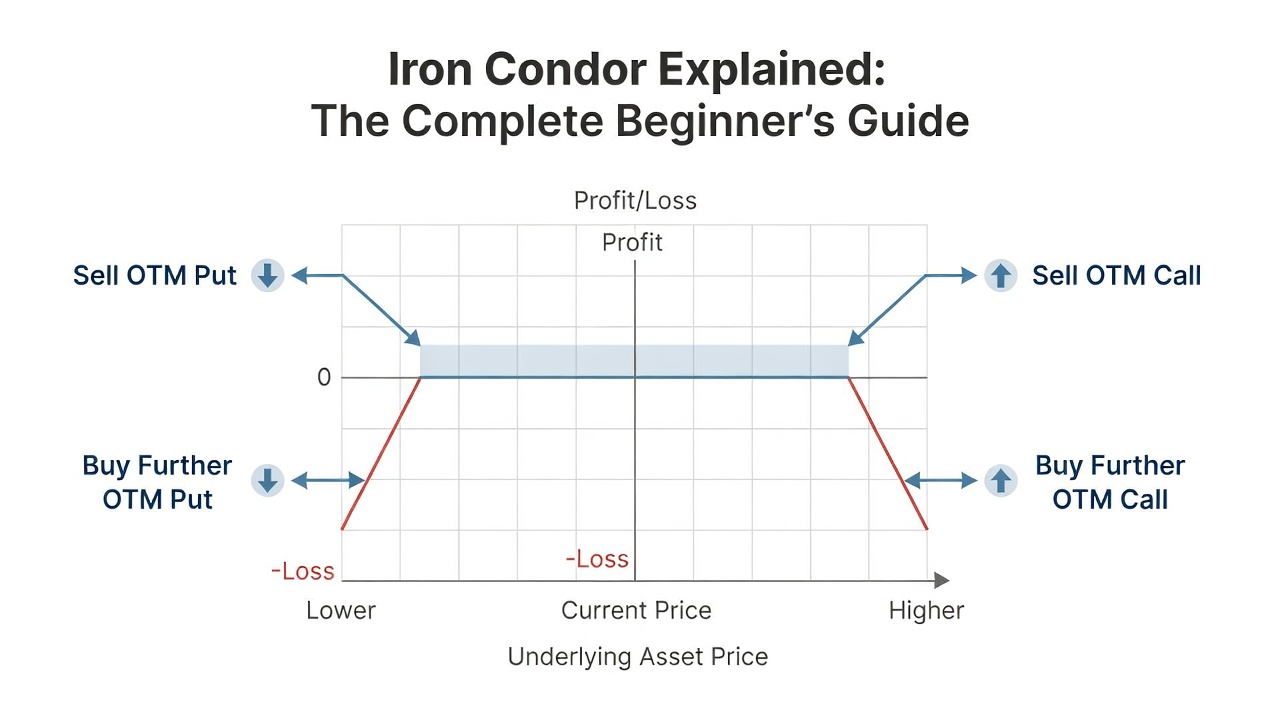
How an Iron Condor Is Constructed: The Four Legs
To build an iron condor, you need four separate option contracts expiring on the exact same date. While four legs might sound intimidating at first, the structure is clean and symmetrical once you break it down.
The lower half of the trade is a bull put credit spread. Here, you sell an out-of-the-money put closer to the current stock price to collect premium, and you buy an out-of-the-money put further down to lock in your downside protection.
The upper half of the trade is a bear call credit spread. Here, you sell an out-of-the-money call above the current stock price to collect premium, and you buy an out-of-the-money call even higher up to lock in your upside protection.
The two options you sell generate the income you want to keep. The two options you buy act like safety nets, ensuring you can never lose an unlimited amount of money if the stock explodes higher or crashes through the floor.
Here is how the four strike prices line up from lowest price to highest price across your options chain:
| Leg Order | Option Type | Action | Purpose |
|---|---|---|---|
| 1 (Lowest Strike) | Put Option | Buy (Long) | Downside Disaster Insurance |
| 2 (Low Strike) | Put Option | Sell (Short) | Lower Profit Boundary / Income Generation |
| 3 (High Strike) | Call Option | Sell (Short) | Upper Profit Boundary / Income Generation |
| 4 (Highest Strike) | Call Option | Buy (Long) | Upside Disaster Insurance |
By executing all four legs together, you establish a defined trading channel where you want the stock to live until expiration.
Free For Traders
One Clear Arrow. Every High-Probability Setup. Free.
The Fusion Indicator combines multiple signals into a single buy/sell arrow on TradingView so you never miss a move.
 → Get The Free Fusion Indicator
Worked Example 1: Setting Up a Standard Iron Condor Step by Step
Let us look at a realistic trade setup so you can see how the numbers actually work in practice. Suppose XYZ stock is currently trading quietly at $100 per share, and you expect it to stay between $90 and $110 over the next 45 days.
To build your iron condor, you select four strikes with a 45-day expiration window. You sell a $90 put for $1.10 and buy an $85 put for $0.35, generating a net credit of $0.75 on the put side.
At the exact same time, you sell a $110 call for $1.05 and buy a $115 call for $0.30, generating a net credit of $0.75 on the call side. Adding both sides together, your total net credit collected is $1.50 per share, which equals $150 in total cash deposited into your brokerage account.
Because each spread has a width of $5.00 between strikes ($115 minus $110 on the calls, and $90 minus $85 on the puts), your maximum risk is the spread width minus the credit received. That means your maximum loss on this trade is capped at exactly $3.50 per share, or $350 total ($5.00 width minus $1.50 credit).
Notice that a stock can never be in two places at once when expiration arrives. The stock can crash or it can moon, but it cannot do both simultaneously, which means you can only ever lose on one side of the trade.
| XYZ Stock Price at Expiration | What Happens to the Options | Net Profit / Loss (Per Contract) |
|---|---|---|
| Above $115.00 (e.g. $120) | Call spread hits maximum loss; put spread expires worthless | -$350.00 (Max Loss) |
| Exactly $111.50 | Upper breakeven point ($110 short strike + $1.50 credit) | $0.00 (Breakeven) |
| Between $90.00 and $110.00 (e.g. $102) | All four options expire completely out of the money | +$150.00 (Max Profit) |
| Exactly $88.50 | Lower breakeven point ($90 short strike – $1.50 credit) | $0.00 (Breakeven) |
| Below $85.00 (e.g. $80) | Put spread hits maximum loss; call spread expires worthless | -$350.00 (Max Loss) |
Your breakeven prices give you a massive $23.00 cushion ($88.50 to $111.50) where the trade makes money. That wide safety margin is why so many experienced retail traders run this strategy repeatedly.

Why Traders Love Iron Condors: Theta Decay and High Probability
When you buy simple calls or puts, time is your mortal enemy. Every single day the stock sits still, theta decay chips away at the value of your contracts.
With an iron condor, you flip the script entirely and make time decay your greatest asset. As we covered in Part 15, short options bleed extrinsic value every calendar day, which means you are profiting just by letting the clock run out.
Iron condors also benefit heavily from implied volatility contractions. When you sell options during high volatility environments, the premiums are expensive, giving you wider cushions and larger credits.
If volatility cools off after you enter the trade, all four contracts lose value quickly. Because you are a net seller of options, that drop in premium allows you to buy back the entire condor for pennies and walk away with a profit early.
Best of all, an iron condor has a statistically high probability of profit when structured properly. By placing your short strikes far away from current prices, you create trades that can win 70% to 80% of the time without requiring any directional guesswork.
Worked Example 2: Managing a Trade When the Stock Moves Against You
No options strategy wins every single time, and knowing how to handle tested strikes is what separates disciplined traders from gamblers. Let us look at what happens when XYZ stock makes an aggressive run toward one of your boundaries.
Suppose you open an iron condor on stock ABC trading at $50 per share. You sell the $45 put, buy the $40 put, sell the $55 call, and buy the $60 call, taking in a total net credit of $1.20 ($120 total cash).
Two weeks into the trade, surprise earnings news sends ABC surging up to $54.50. Your short $55 call is now in danger of going in the money, and the value of your call spread has expanded to show a paper loss.
However, look at what happened to your put spread down at the $45 and $40 strikes. Because the stock rallied far away from the puts, that entire side of the condor has lost nearly all of its value and can be bought back for just $0.05.
You have three smart ways to manage this situation depending on your trading plan:
First, you can simply close the winning put spread to lock in almost all of its original profit, reducing your overall risk on the trade. Second, you can roll the entire put spread upward closer to the stock price to collect even more credit and cushion the call side.
Third, because your maximum loss is strictly capped at $380 ($5.00 spread width minus $1.20 credit), you can choose to let the trade play out if your thesis remains intact. You will never face a surprise margin call because your long $60 call prevents catastrophic losses.
From Find Better Trades
Only Trade When Momentum Is HEAVILY In Your Favor
The Power Index oscillator measures trend conviction at a glance — it filters out weak, choppy action so you only take the strong moves.
 → See The Power Index

Iron Condors vs. Strangles: Why the Wings Make All the Difference
In Part 33, we explored strangles, where a trader sells an out-of-the-money call and an out-of-the-money put without buying any protective options. An iron condor is essentially a short strangle with safety wings attached.
When you sell a naked strangle, you collect more total premium because you are not paying for protective options. The trade-off is that you take on undefined, theoretically infinite risk if the stock makes an unprecedented move.
An iron condor buys those outer protective wings—the long call and the long put. Buying those options costs a little bit of your credit, but it completely removes unlimited risk from the equation.
Because the risk is strictly defined, your broker requires far less collateral to hold an iron condor compared to a naked strangle. This makes iron condors accessible even for smaller trading accounts that are not approved for naked option selling.
| Feature | Iron Condor | Short Strangle |
|---|---|---|
| Risk Profile | Defined (Capped Loss) | Undefined (Unlimited Risk) |
| Buying Power Needed | Low (Spread width minus credit) | High (Substantial margin required) |
| Account Level Required | Standard Spread Approval (Tier 2/3) | Highest Margin Approval (Tier 4) |
| Net Credit Potential | Moderate (Reduced by long wings) | Higher (No insurance cost) |
For beginner and intermediate traders, the peace of mind that comes from knowing your absolute worst-case scenario before entering a trade is worth every penny of that insurance cost.
How to Choose the Right Strikes and Expirations
Setting up a profitable iron condor comes down to picking the right time frame and setting sensible price boundaries. If you pick strikes that are too close, you will get run over by normal market fluctuations.
I typically look for expiration dates between 30 and 45 days out. This window sits right in the acceleration phase of theta decay, allowing you to capture rapid premium erosion without staying exposed to market risk for months on end.
When selecting strikes, I look at the option’s delta, which we broke down back in Part 16. A reliable starting benchmark is selling the 15 to 20 delta call and the 15 to 20 delta put.
A 15 delta option roughly implies an 85% theoretical probability that the option will expire out of the money. By selling options at the 15 delta level on both sides, you build a wide channel where the underlying stock has plenty of room to bounce around without threatening your trade.
Finally, always ensure you trade iron condors on highly liquid stocks or broad market index exchange-traded funds with tight bid-ask spreads. Because you are opening four contracts simultaneously, wide spreads can cost you a significant portion of your edge right at entry.
Common Mistakes Beginners Make With Iron Condors
1. Holding all the way until expiration afternoon: New traders often try to squeeze out the final nickels and dimes of profit by holding until the final trading hour. This exposes you to sudden late-day price spikes and assignment headaches when you could have closed the position at 50% of max profit days earlier with minimal risk.
2. Setting strikes too narrow to chase bigger credits: Squeezing your short strikes close to the current stock price brings in a huge upfront credit, but it drastically shrinks your safety channel. You end up turning a high-probability income trade into a low-probability gamble that constantly gets challenged by normal daily price swings.
3. Trading through major binary events like earnings: Opening an iron condor right before a company reports quarterly earnings is an easy way to get burned. Earnings announcements frequently cause massive overnight gaps that blow clean through your short strikes and protective long wings before you can react.
4. Trading illiquid underlying stocks with wide spreads: Because an iron condor uses four separate option legs, entering and exiting an illiquid product means paying heavy slippage four times over. Stick to heavily traded index funds or major blue-chip equities where options trade by thousands of contracts every day.
5. Panicking at the first sign of a tested strike: When a stock trends toward one of your short strikes, your portfolio dashboard will flash red with an unrealized loss. Beginners often panic-sell at the absolute worst moment instead of remembering that defined risk protects them and time decay is still constantly working in their favor.
Iron Condor Strategy FAQ
Can I lose money on both sides of an iron condor? No, you can never lose on both sides of a single iron condor trade simultaneously at expiration. Because a stock cannot be both above your upper strike and below your lower strike at the exact same moment, only one side of your condor can ever suffer a loss.
When should I take profits on an iron condor trade? A widely accepted rule of thumb among experienced options traders is to close your iron condor when you reach 50% of your maximum potential profit. Taking profit early frees up your capital, eliminates your remaining market risk, and significantly boosts your annual win rate over time.
What happens if one of my short options expires in the money? If an iron condor expires with the stock past your short strike, that option will be automatically assigned and exercised by your broker. However, your long protective wing caps your loss, and most traders avoid assignment entirely by simply closing or rolling the position before expiration day arrives.
How much money do I need in my account to trade an iron condor? Your required margin is equal to the width of the widest spread minus the total net credit you collected. For a trade with a $5-wide spread that brings in a $1.50 credit, your broker only requires $350 in cash collateral per contract to open the position.
In Part 35, we are going to explore one of the most reliable long-term wealth builders in the options world: the famous Wheel Strategy and how it lets you get paid consistently to acquire stocks you actually want to own.
📈 Want More? Join Our Free Trading Community
- Trading Strategy Guides Telegram — daily strategy tips and market insights
- Find Better Trades Telegram — free trade signals delivered to your phone
- Find Better Trades on YouTube — live trade breakdowns and tutorials
Lesson 34 of 52 in the free Options Trading Course.
← Previous: Options Strangles Explained: A Cheaper Bet on Big Moves
Next: Wheel Strategy Explained: Earn Income on Stocks You Want to Own →